torstai 28. toukokuuta 2015

Keväinen voikukkasima – Dandelion Mead


Onko viehättävämpää ajatusta kuin kukista valmistettu juoma? Voikukkasima ei ole ainoastaan hyvää ja kauniin väristä, vaan se on myös melkoinen terveysjuoma. Voikukkaa on aikoinaan käytetty runsaasti nesteenpoistajana, mutta onpa se myös kovin vitamiini- ja rautapitoinen villiyrtti. Tähän aikaan vuodesta voikukan kukinnot ovat parhaimmillaan siman valmistukseen. Ei siis muuta kuin nips ja naps ja virkistävää juomaa valmistamaan! Vielä ehdit alkukesän helteille.


Voikukkasima:

4 l voikukan kukkia

5 l vettä 

2 sitruunaa
1 dl siirappia
4 dl sokeria
 

1/4 tl hiivaa

(rusinoita)

Kerää voikukan kukinnot aurinkoisena päivänä, jotta ne ovat kuivat ja avonaiset. Laita kukinnot suureen kattilaan ja mittaa päälle puolet vedestä. Kuumenna seos kiehuvaksi ja keitä noin 5 minuuttia. Siivilöi kukat uutoksesta ja ota neste talteen. Keitä sitten kukista vielä toinen uutos lopun veden kanssa. Keitä jälleen 5 min ennen siivilöintiä. Kaada kuuma neste sokerin ja siirapin päälle. Pese sitruunat huolella ja kuori ohuelti. Kuori sitten sitruunoista kitkerä valkoinen kuoriosa. Lisää simaan sitruunan keltaiset kuoret sekä viipaloitu hedelmäliha. Anna seoksen jäähtyä kädenlämpöiseksi. Ota erilliseen kuppiin pieni tilkka simaa ja sekoita siihen pieni pala hiivaa. Sekoita sitten neste siman joukkoon. Anna siman käydä huoneenlämmössä kevyesti peitettynä seuraavaan päivään. Pullota sima. Voit halutessasi lisätä kuhunkin pulloon myös muutaman rusinan. Siirrä sima kylmään käymään. Se on valmista juotavaksi muutamassa päivässä: rusinat nousevat tällöin pullon yläosaan.


*  *  *


Is there any sweeter idea than a drink made of flowers? Dandelion mead is not only tasty and beautiful in colour but it’s also quite a healthy drink. In the past dandelion has been used a lot as a diuretic, but it’s also high in vitamins and iron. At this time of the year the dandelions are at their best to be picked and used in mead. You’re only a snip and a snap away from delicious and refreshing drink! Just in time for the warm summer days.


Dandelion Mead:

4 l (8 1/2 pt) dandelion inflorescences
5 l (10 1/2) water
2 lemons
1 dl (1/2 cup) syrup
4 dl (1 3/4 cups) sugar
1/4 tsp. fresh baking yeast
(raisins)

Pick the dandelion inflorescences on a sunny day so that they are dry and open. In a large kettle, add the inflorescences and half of the water. Bring to a boil and cook for about five minutes. Sieve the extract to a large container. Place the inflorescences back into the kettle and add in the rest of the water to cook it again for five minutes before sieving. Pour into the container. Mix in the syrup and sugar. Wash the lemons carefully and peel off thinly the yellow skin. Cut off the white part. Add the yellow skin and the sliced up lemons into the mead. Let the mixture cool down to body temperature (37 C / 98,6 F). Take a small piece of fresh baking yeast, about the size of a pea, and mix it together with a small amount of the mead. Pour the mixture back into the container. Let the mead ferment until the next day. Sieve out the lemon pieces before bottling the mead. If you like, you can place a few raisins on the bottom of each bottle. Place the bottles into a cold place to ferment. The mead will be ready in a couple of days: you notice it when the raisins start to float in the bottle.


sunnuntai 24. toukokuuta 2015

Terveysruokaa: maittavat jauhemaksapihvit – Healthy and tasty: Liver Patties


"Itse tehdyt maksaruoat ovat luonnollisesti kaupasta ostettuja tömäkämpiä, joten liian innokkaaksi maksalla kokkailjaksi ei kannata ruveta. 

Sisäelin- ja veriruoat ovat terveellisiä ja maittavia, mutta niitä tulee valmistettua harmillisen harvoin. Olen enemmän tottunut veren käyttöön ruoassa, mutta viime viikolla valmistin jauhemaksapihvejä ensimmäistä kertaa. Pihvien raaka-aineet ovat hyvin yksinkertaisia ja edullisia ja niistä saa maittavaa ja terveellistä ruokaa. Kokeile voimakkaan makuisten pihvien kyytipoikana hyvää olutta, niin makuelämys vie kielen mennessään.


Jauhemaksapihvit:

300 g perunoita
2 sipulia
300 g jauhettua maksaa
1 kananmuna
1 tl suolaa
ripaus valkopippuria
mustapippuria
meiramia

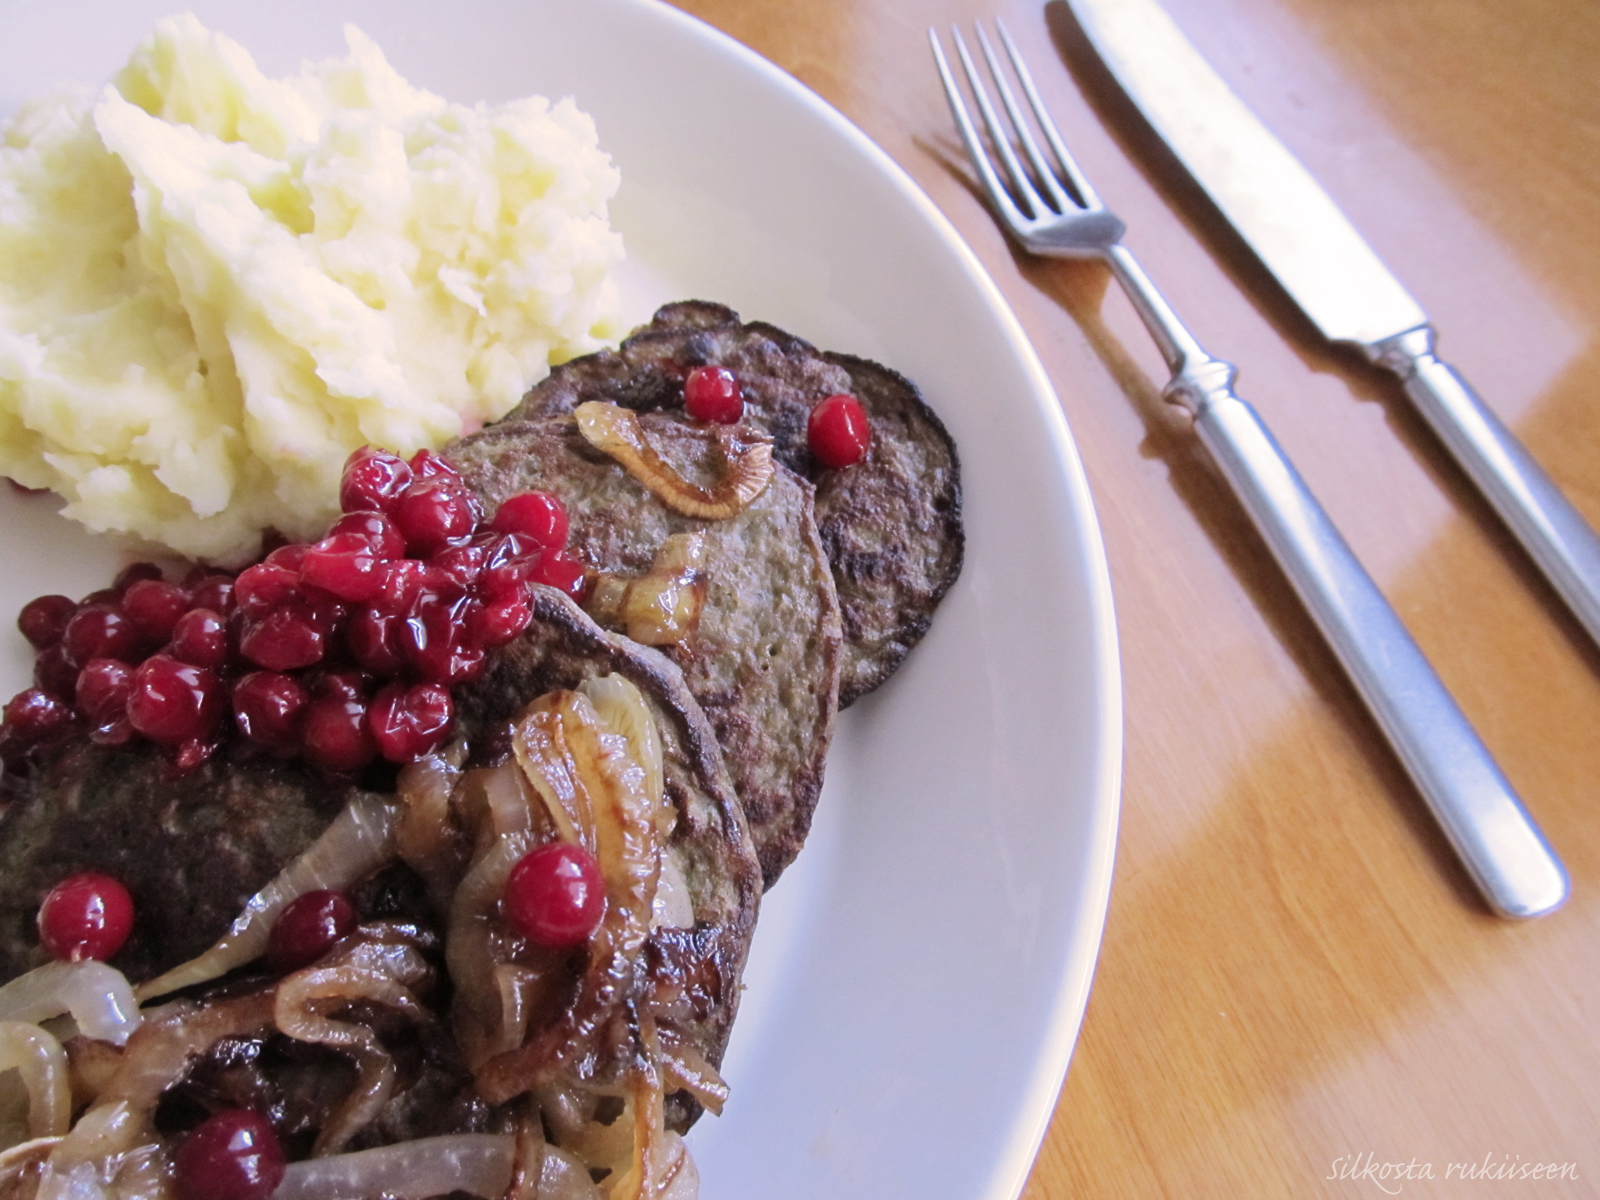
Kuori ja raasta raa'at perunat hienoksi raasteeksi. Pilko sipulit. Jos käytät kokonaista maksaa, jauha se lihamyllyssä. Sekoita ainekset keskenään, lisää kananmuna ja mausteet. Jos taikina tuntuu löysältä, voit lisätä siihen hieman perunaa. Paista taikinasta pannulla keskilämmöllä paksuhkoja pihvejä. Tarjoa esimerkiksi perunamuusin, puolukkasurvoksen ja haudutettujen sipulirenkaiden kera.


Maksan rakenne on erikoinen. Kokonaisena se on sitkaan tuntuinen mutta hieman hyllyväinen. Jauhettuna maksasta tulee käytännössä nestettä. Omasta taikinastani tuli suhteellisen löysää, mutta maksa vaikutti kuumalla pannulla koaguloituvan kuin veri ja pihvit onnistuivat erinomaisesti. Paistoin pihvit tavallisella pannulla, mutta löysemmän taikinan kanssa voi kokeilla myös pikkuletuille tarkoitettua ohukaispannua, joka varmistaa pihvin pysyvän toivotulla tavalla kasassa.

Maksa sisältää runsaasti rautaa sekä B12-vitamiinia. Niiden lisäksi se sisältää muihin ruoka-aineisiin verrattuna moninkertaisesti A-vitamiinia, jota ihmisen täytyy saada ravinnosta sillä keho ei sitä itse tuota. Eläinkunnan tuotteissa A-vitamiini esiintyy retinoideina, kasvikunnan tuotteissa karotenoideina, jotka muuttuvat ruoansulatusjärjestelmässämme retinoideiksi. Maksan A-vitamiinipitoisuus on niin suuri, että sen käytön kanssa kannattaa olla jossain määrin varovainen. Pitkään kestänyt liika-annostus aiheuttaa hitaasti sulavan A-vitamiinin määrän kasautumista ja sitä myötä terveyshaittoja. Tämä ilmenee esimerkiksi päänsärkynä tai väsymyksenä sekä ruoansulatuskanavan ja ihon oireiluna. Tämän vuoksi maksan käytölle on asetettu rajoituksia etenkin alle kouluikäisille lapsille sekä raskaina oleville naisille. Maksaa käytetään nykyään kuitenkin suhteellisen vähän ja erilaiset maksaruoat sisältävät erilaisia määriä maksaa. Tämän vuoksi onkin sanottava että A-vitamiinin aiheuttamat myrkytystilat ovat erittäin harvinaisia. Itse tehdyt maksaruoat ovat luonnollisesti kaupasta ostettuja tömäkämpiä, joten liian innokkaaksi maksalla kokkailijaksi ei kannata ruveta. Keskeistä myrkytystilan suhteen on se, että A-vitamiinia nautitaan pidemmällä aikavälillä runsaasti yli suositellun määrän. 100 g naudan tai sian maksaa sisältää retinoideja hieman alle 20 mg, mikä vastaa aikuisella noin kuukauden tarvetta. Popsittuani siis viikon sisään maksaa ehkä parinsadan gramman edestä on oma A-vitamiinikiintiöni täysi hyväksi aikaa.


*  *  *


Different types of dishes made from organs and blood are healthy and delicious, but I seem to cook them too rarely. I'm more used to cooking with blood, but last week I prepared liver patties for the first time in my life. The ingredients are very simple and affordable and they make very tasty and healthy food. Try serving some quality lager with the patties and the taste experience will be perfected.


Liver Patties:

300 g (10 1/2 oz) potatoes
2 onions
300 g (10 1/2 oz) grinded liver
1 egg
1 tsp. salt
hint of white pepper
black pepper
marjoram

Peel and grate the raw potatoes into fine mash. Cut the onions. If you are using a whole piece of liver, grind it in a meat grinder. Mix the ingredients together and add in the egg and seasonings. If the batter seems too runny, try adding some more potato to it. On medium heat, fry the batter into thick-ish patties. Serve with mashed potatoes, mashed lingonberries and fried onions.


The consistency of liver is peculiar. As a whole piece it's somewhat hardy but a bit wobbly. When grinded it pretty much turns into liquid. My batter was quite runny but when fried the liver seemed to coagulate like blood and the patties turned out very good. I fried the patties on a regular frying pan but you can also try out a pancake pan to make sure the batter stays in control.


Liver contains a lot of iron and vitamin B12. It also contains multiple times more vitamin A than any other ingredient. Vitamin A can’t be formed in our bodies so we have to get it through food. In foods of animal origin vitamin A appears in retinol form whereas in foods of vegetable origin it appears as carotenoids that are converted into retinol form in our digestive system. The concentration of vitamin A is so high in liver that you should be a bit careful with it. If consumed excessively on a longer period of time, the toxic levels of vitamin A start to accumulate. It leads to different types of symptoms such as fatigue, headache and problems with digestive system and skin. This is why there have been set certain limitations especially for small children and pregnant women. Nowadays liver is not used that much though, and different foods contain different amounts of liver. Therefore it's not very likely to get intoxication due to vitamin A. Homemade liver food contains more vitamin A than readymade meals, obviously, so when cooking it's recommendable to not overuse liver. However, in the question of intoxication the main thing is not to get too much constantly. 100 grams (3 1/2 oz) of liver contains a bit less than 20 mg of retinol which for an adult equals about a month's recommended intake. After having eaten maybe about 200 grams of liver during one week it seems I have had my share of vitamin A for a while.


perjantai 1. toukokuuta 2015

Tippaleivät – Funnel Cakes


"Alunperin ilmeisesti Saksasta kotoisin olevat tippaleivät olivat jo myöhäiskeskiajalla Pohjolassa hienoa herkkua, joita tarjottiin ympäri vuoden erilaisissa juhlallisuuksissa.

Vapun vietto meinasi jäädä tyystin välistä kovien opiskelukiireiden vuoksi. Sima jäi tänä vuonna vain haaveeksi, mutta suunnittelin jo hyvissä ajon kokeilevani viimein tippaleipien tekoa. Osoittautui että kotitekoiset tippaleivät ovat melkoisen erimakuisia kuin kaupasta ostettavat! Taikinan valmistaminen ja paisto on nopeaa, mutta hieman tekniikkaa tippaleivät vaativat. Muutaman paistokerran jälkeen leivonnaiset syntyvät takuulla vaivattomasti eikä paluuta kaupan versioihin enää ole.

Ilmeisesti perinteiset tippaleivät ovat olleet rakenteeltaan ohuita ja melko kookkaita. Alunperin ilmeisesti Saksasta kotoisin olevat tippaleivät olivat jo myöhäiskeskiajalla Pohjolassa hienoa herkkua, joita tarjottiin ympäri vuoden erilaisissa juhlallisuuksissa. Sitä, milloin ja miksi tippaleivät kiinnittyivät etenkin suomalaisen Vapun viettoon, ei tarkasti tiedetä. Näin on kuitenkin ollut vähintään vuosisadan vaihteesta. Nykyisin tippaleivät ovat siman ja munkkien rinnalla klassinen toukokuun alun perinneherkku.


Tippaleivät:

Taikina:
2 kananmunaa
3 rkl sokeria
1/2 rkl tuorehiivaa
3 dl maitoa tai kermaa
4 dl vehnäjauhoja

Paistamiseen:
1/2 l rypsiöljyä

Koristeluun:
tomusokeria

Sekoita munia ja sokeria voimakkaasti kunnes ne ovat hyvin vaahtoutuneet. Lämmitä maito kädenlämpöiseksi ja sekoita siihen hiiva. Lisää neste munavaahtoon ja sekoita joukkoon vehnäjauhot huolellisesti sekoittaen. Kuumenna rypsiöljyä kattilassa 170–180-asteiseksi. Pidä kattilan kansi käden ulottuvilla rasvapalon varalta. Voit testata rasvan kuumuutta tipauttamalla kuumaan rasvaan tipan taikinaa. Jos taikina kypsyy alle minuutissa kullanruskeaksi, rasva on sopivan kuumaa. Höyryävä öljy on liian kuumaa.

Annostele huoneenlämpöistä taikinaa pursotuspussiin tai vastaavaan, jossa on pienehkö suulake. Pursota taikinaa öljyyn jatkuvana ohuena nauhana edestakaisin muodostaen siitä pyöreähkön ristikkomaisen kakkusen. Voit käyttää apuna metallista keitto- tai reikäkauhaa, jonka upotat hieman öljyn pinnan alapuolelle. Kauha tukee taikinaa pitäen sen paremmin kasassa. Anna leivoksen ruskistua öljyssä ja käännä se sitten ympäri ruskistaaksesi myös toinen puoli. Nosta tippaleipä talouspaperin päälle valumaan. Ripottele jäähtyneen tippaleivän päälle runsaasti tomusokeria. Tarjoa siman kanssa.


Ensimmäinen kokeiluni tippaleipien paistamisessa oli jännittävä. Päätin kokeilla pursotukseen erilaisia tekniikoita. Kokeilin sekä muovista pursotinta että Minigrip-pussia josta leikkasin kulman auki. Kummatkin olivat välineinä mainioita. Pursotusaukon suuruus on tässä keskeinen tekijä: riittää että se on vain millin, pari halkaisijaltaan. Kokeilin myös käyttää apuna erilaisia välineitä: keittokauhaa, reikäkauhaa, pyöreää leivosmuottia sekä pursotusta ilman apuvälinettä. Kätevimmäksi välineeksi osoittautui mielestäni syvä keittokauha, johon taikina kerääntyi. Kauhasta leivoksen sai kätevästi pyöräytettyä ympäri. Toisaalta pursotus onnistui hyvin myös ilman apuvälineitä. Tällöin pursottamisessa piti vain olla tarkempi: pursotin taikinanauhaa yhtenäisenä ja muodostin siitä vähitellen suurenevan ristikon, jotta leivos pysyi paremmin kasassa. Jotkut paistavat tippaleivät pestyssä säilyketölkissä, josta on poistettu kansi ja pohja. Muotti pitää leivoksen hyvin kasassa ja sen saa muodostettua kohtuullisen korkeaksi. Muotti kannattaa poistaa tippaleivän ympäriltä kun se on vielä hieman pehmoinen.

Tässä vielä pari huomaamaani seikkaa. Jos paistat tippaleipiä ilman eritystä muottia, kokeile pyöräyttää öljyyn varovasti kevyt pyörre, joka pitää tippaleivän taikinan alkuvaiheessa paremmin aloillaan. Pursotustahdin on syytä olla melko hidas, jotta taikina ehtii hieman kypsyä. Voi myös olla hyvä kääntää tippaleipä ympäri jo hyvin varhaisessa vaiheessa paistoa, jotta löysä yläpuoli pääsee myös kypsymään ja jähmettymään nopeasti. Pyörittelin tippaleipää pari kertaa paiston aikana ympäri.


*  *  *


I almost missed May Day because of the busy schedules at the university. I didn’t have time to make mead this time but for a long time I had been planning of making funnel cakes. It turns out that homemade funnel cakes are pretty different from the ones you can buy at the store! Preparing the dough and deep frying the treats is quick but you need a little technique to make them perfect. I bet after a few times of frying these babies it starts to get very easy and there’s no return to those ready made ones!

Apparently traditional funnel cakes have been quite thin and large. Nowadays Finns eat their funnel cakes rather small and thick. Funnel cakes seem to originate to Germany but in the North they were much appreciated treats already in the late Middle Ages and they used to be served around the year in different types of festivities. It is not entirely known when and why funnel cakes started to be especially May Day’s treats in Finland, but apparently it has been so for over a century already. Nowadays funnel cakes are traditionally served during May Day festivities along with Finnish mead and doughnuts.


Finnish Funnel Cakes:

Dough:
2 eggs
3 tbsp. sugar
1/2 tbsp. fresh baking yeast
3 dl (1 1/4 cups) milk or cream
4 dl (1 3/4 cups) plain flour

For Frying:
1/2 l cooking oil

For Decoration:
powdered sugar

Beat the eggs and sugar together into a foam. Heat the milk into body temperature and add in the fresh baking yeast. Add the milk to the egg foam and finally add in the plain flour while carefully mixing. In a steel kettle, heat up the cooking oil to about 170 degrees C / 340 F.  Keep the lid of the kettle close in case the oil catches fire. You can test the temperature of the oil by placing a small dab of dough into the kettle: if it cooks in about a minute, the oil is hot enough. If the oil steams it’s too hot.

Put the dough into a piping tube with a small nozzle. Squeeze the dough into the hot oil as a continuing string, forming it into grid. If you like, you can use a metallic soup ladle to help: place the ladle into the oil and extrude the dough into it. The ladle helps you to control the dough. Let the cake fry until it has a golden color, then turn the cake around. Place the funnel cake onto some paper towels to trickle. Shake some powdered sugar on top of the cold funnel cake. Serve with mead.


My first experiment with funnel cakes was exciting. I decided to try out different ways of preparing the cakes. I tried a hard plastic piping tube and a plastic Minigrip bag from which I cut off the corner. Both of them were very good. Just be careful with the size of the nozzle: it should be only a millimeter or two wide. I also tried out different tools when frying the funnel cakes: a deep soup ladle, hole ladle and a round mold for pastry. I also tried out frying the cakes with no extra tools. This time I found the deep soup ladle to be the best aid. It helped me control the movements of the dough and it was easy to flip the cake around using the ladle. On the other hand, I thought it was also just fine not using any tools at all when squeezing the dough. This required being more careful when squeezing the dough: the string had to be continuous and it was important to form first a small grid and then try to make it bigger little by little. Some people use old cans to fry the funnel cakes: they cut off both the top and the bottom of the can and then use it as a mold. This helps you to make a thicker cake. Just remember to remove the mold before the cake gets hard.

Here are also a couple other things I noticed. If you are frying the cakes without a mold, try out making a light swirl into the oil (be careful, obviously it’s burning hot) to keep the dough in control during the beginning. Squeeze the dough quite slowly so that it has time to fry a bit before some fresh soft dough gets on top again. It might also be a good idea to flip the cake around already in the beginning of the frying so that the soft dough settles a bit. I flipped my cakes around a couple of times during frying. 


torstai 2. huhtikuuta 2015

Kotitekoinen mämmi – Homemade mämmi


"Mämmiä tiedetään syöneen Varsinais-Suomessa jo 1200-luvulla.

Suomalainen ruokakulttuuri on iloinen sekamelska alkuperäisiä suomalaisia ruokia sekä itäisen ja läntisen naapurimaamme tarjoamia vahvoja vaikutteita. Useat Suomessakin perinteeksi muodostuneet ruoat ovat kiertäneet vuosisatoja ympäri Eurooppaa erikoistuen alueittaisiksi herkuiksi. Jotkut ruoat kuitenkin ovat syntyneet juuri täällä ja niiden levinneisyys on jäänyt melko kapeaksi. Tänään olen perehtynyt yhteen perinteisimmistä herkuistamme. Mämmi on alkuperäinen suomalainen uunissa kypsytettävä imelletty ruispuuro, joka on kiinnittynyt erityisesti pääsiäisen pitkänperjantain viettoon. Sen perusraaka-aineet ovat hyvin yksinkertaiset: ruis sekä vesi. Osa käytettävästä rukiista on mallastettua ja osa pelkästään jauhettua. Jauhot sekoitetaan lämpimään veteen ja niiden annetaan imeltyä useiden tuntien ajan. Lopulta mämmiä keitetään hieman kasaan ennen sen paistamista uunissa. Kaiken kaikkiaan mämmin valmistamiseen voi varata aikaa seitsemästä kahdeksaan tuntia.

Mämmiä tiedetään syöneen Varsinais-Suomessa jo 1200-luvulla. Se levisi pääsiäisen ajan ruokana muualle Suomeen hitaasti vuosisatojen kuluessa: 1700-luvulla sitä tavattiin jo muuallakin Lounais-Suomessa, Hämeessä sekä osissa Etelä-Suomea. 18001900-luvuilla mämmin nauttiminen pääsiäisenä levisi muualle Suomeen, tosin joidenkin lähteiden mukaan Etelä-Karjala ja Lappi omaksuivat tavan vasta 1930-luvulla. Vanhemmissa mämmiresepteissä pistää silmään se, että aiemmin mämmistä on valmistettu voimakkaamman makuista käyttämällä jauhoista kaksi kolmannesta maltaisina ja vain kolmannes tavallisina ruisjauhoina. Nykyisin suhde on päinvastainen.


Mämmi:

Puuro:
2 l vettä
5 dl mämmimaltaita (eli mallasjauhoa)
10 dl ruisjauhoja
1 1/2 rkl jauhettua pomeranssinkuorta
1/2 tl suolaa
(4 rkl siirappia)

Pinnalle:
1 dl vettä
4 rkl siirappia

Kuumenna suuressa kattilassa 1 litra vettä helmeileväksi, ei kiehuvaksi (n. 60 astetta). Sekoita veteen puolet mämmimaltaista ja ruisjauhoista. Ripottele pinnalle ohuelti ruisjauhoja ja peitä kattila kannella. Aseta lämpimään paikkaan imeltymään 1 1/22 tunniksi. Kuumenna jälleen litra vettä helmeileväksi ja lisää puuroon loput maltaat ja ruisjauho. Ripottele pinnalle jälleen ruisjauhoja ja jatka imeltämistä 1 1/22 tuntia. Mämmin pitäisi olla tässä vaiheessa löysää puuroa. Tarvittaessa lisää ruisjauhoja. Lisää puuroon pomeranssinkuori ja suola sekä tarvittaessa siirappi, tarkista maku. Keitä mämmiä jatkuvasti sekoittaen 10 minuuttia. Anna mämmin jäähtyä haaleaksi ja kaada sitten paistovuokiin. Jätä vuokiin kolmannes kuohumisvaraa. Valele pinta kauttaaltaan sokeri-siirappivedellä. Paista 150-asteisessa uunissa noin kolme tuntia. Tarjoa kylmä mämmi maidon tai kerman sekä sokerin kera. Mämmi on parhaimmillaan muutaman päivän jääkaappisäilytyksen jälkeen.


Mämmimaltaat ovat hienoksi jauhettua mallastettua ruista. Mallastaminen on menetelmä, jossa viljan jyvät liotetaan, idätetään ja kuivataan. Liotuksessa jyvä imee itseensä vettä ja sen elintoiminnot heräävät. Jyvästä työntyy esiin juuri- sekä lehti-idut. Liotetut jyvät  levitetään tasolle ja niitä kosteutetaan ja sekoitellaan antaen niiden itää useita vuorokausia. Idätyksen aikana jyviin muodostuu entsyymeitä, jotka saattavat jyvän ainesosat helposti veteen liukenevaan muotoon ja hiivalle sopiviksi ravintoaineiksi. Lopulta idätetyt jyvät kuivataan, jolloin jyvän elintoiminnot pysähtyvät. Jyvään muodostuu väri- ja aromiaineita ja sen säilyvyys paranee huomattavasti. Kuivauksen jälkeen herkästi karisevat idut on helppo mekaanisesti erotella jyvistä. (Lähde: sahtiopisto.fi) Mallastetut jyvät hienonnetaan tarpeen mukaan esimerkiksi karkeaksi mallasrouheeksi, joka soveltuu hyvin oluen panemiseen ja leivontaan, sekä hienommaksi mallasjauhoksi, jota käytetään esimerkiksi mämmin ja leivän valmistamisessa.


Aikoinaan mämmi on valmistettu matalissa koivutuohisissa astioissa, tuokkosissa (tunnetaan myös nimellä rove, rope tai ropponen). Valmistuksessa on käytetty perinteisesti leivinuunia, jonka pehmeässä jälkilämmössä tuokkosten on annettu muhia jopa seitsemän tuntia. Nykyisin kypsennystä on sähköuuneja silmällä pitäen hieman tehostettu, mutta jos olet niin onnekas että omistat leivinuunin, hyödynnä toki sitä mämmin valmistuksessa. Leivinuunin ylinen on myös loistava paikka mämmin imellyttämiseen. Sähköuunitalouksissa mämmi on hyvä imeltää 50-asteisessa uunissa, sillä huoneenlämpö on aivan liian kylmä imeltymisen aiheuttavan kemiallisen reaktion aikaansaamiseksi. Mämmi on myös hyvin ravinnepitoinen ruoka. Ruisjauhot ja -mallas sisältävät jopa 13 % kuituja, runsaasti proteiinia sekä hivenaineita. Imeltymisen aikana rukiin tärkkelys pilkkoutuu sokeriksi, jolloin mämmistä tulee luontaisesti makeaa. Jos mämmin imeltäminen onnistuu, siihen ei tarvitse lisätä erikseen makeutusta. Mämmin pinnalle ennen paistoa siveltävä vesi-siirappiseos tuo pintaan makeutta mutta ennen kaikkea estää pinnan kuorettumista paiston aikana.

Kaupan mämmi on hyvin makeaa ja siihen lisätään runsaasti sokeria. Kotitekoisen mämmin makeuden voi päättää itse ja useimmiten riittää, että mämmin pinnalle ripottelee tarjottaessa hieman sokeria. Kotitekoinen mämmi oli erinomaisen maukas kokemus, omasta mielestäni paljon maittavampaa kuin kaupan tuotteet. Mämmin tähteet voi halutessaan pakastaa ja hyödyntää myöhemmin sellaisenaan tai esimerkiksi leipätaikinassa.


*  *  *


The Finnish food culture is a great mixture of original Finnish dishes and strong influences given both by our western and eastern neighbouring countries. Many dishes that are considered traditional in Finland have been circling around the Europe for centuries and forming into different types of national dishes. Some dishes, though, have been born right here and haven't spread around as widely. Today I have gotten to know better one of the most traditional treats Finland has. Mämmi is originally Finnish starch sweetened rye porridge that is especially eaten during Easter. It has very simple basic ingredients: water and rye. Part of the rye is simply grinded, part malted. The flour is mixed into warm water and left to sweeten for several hours. Finally the porridge is cooked for a few minutes before carefully baking it for several more hours. If you want to try making your own mämmi, you should reserve about seven or eight hours for the process.

The earliest known recordings of mämmi are from 1200’s when it was eaten in Finland Proper. By the centuries the tradition of eating mämmi spread around Finland so that by the 1700’s it was known also in other regions of Southwest Finland, Tavastia and parts of Southern Finland. In the 19th and 20th century the dish spread around the country, although some sources say that Lapland and South Karelia only adopted this treat in the 1930’s. What strikes me in the older recipes of mämmi is that it used to be made stronger by using two thirds of malted rye and only one third of regular rye flour. These days the measurements are reverse.


Traditional Finnish Mämmi:

The porridge:
2 l (4 pt) water
5 dl (2 1/4 cups) grinded malted rye
10 dl (4 cups) rye flour
1 1/2 tbsp. sour orange powder
1/2 tsp. salt
(4 tbsp. syrup)

On the surface:
1 dl (1/2 cup) water
4 tbsp. syrup

In a large kettle, heat up one litre of water so that it sparkles but isn’t boiling (about 60 C / 140 F). Add about half of the malted rye and rye flour into the water and mix carefully. Sprinkle some rye flour on the surface, cover the kettle with a lid and place into a warm place to sweeten for about 1 1/2 or 2 hours. Then heat up another litre of water as before and add it to the mixture with the rest of the malted rye and rye flour. Sprinkle some rye flour on the surface again and continue sweetening for another 1 1/2 or 2 hours. After this mämmi should be like runny porridge. If needed, you can add some rye flour. Season the porridge with sour orange, salt and syrup, if needed. Cook the porridge for about 10 minutes while stirring: it gets burnt very easily. Let mämmi cool down a bit before pouring it into deep oven trays. Leave about one third of the oven tray empty so that mämmi has room for roiling. Mix the water and syrup together and baste the surface of the porridge. Bake mämmi in 150 C / 300 F for about three hours. Serve cold mämmi with milk or cream and some sugar. Mämmi is at its best after a few days in the fridge.


The malted rye used in mämmi is grinded into flour. Malting is a procedure where grains are soaked, left to sprout and finally dried. While being soaked the grains absorb a lot of water and their vital functions are awaken. The grains start to form sprouts. After being soaked the grains are spread on a platform where they are kept moist and rolled over every now and then. They are left to sprout for several days. During this time the grains form enzymes that make their component parts easily dissolving and nutritious for yeast. Finally the grains are dried to stop their vital functions. During drying the grains form colour and aroma. After drying it’s easy to mechanically sort out the dry sprouts off the grains. (Source: sahtiopisto.fi) The malted grains can be grinded according to their use into rough  groats that work well when brewing beer and baking, or then into finer flour that is used in mämmi or breads.

Traditionally mämmi was made in small vessels made of bichbark. It was baked in baking ovens that store heat softly so that mämmi could be baked for up to seven hours. These days most of us have electric ovens so it takes less time to bake the dish, but if you are lucky enough to have a traditional baking oven, feel free to use it when making mämmi. The top of the baking oven is also great for sweetening the porridge. If you have an electric oven, it’s good to sweeten the porridge in about 50 C / 120 F because the normal room temperature is way too cold for the chemical process that turns starch into sugar.

If you buy mämmi from the store you will notice that it is very sweet. Usually the ready made mämmi has a lot of added sugar in it. When making mämmi yourself you can decide how sweet you want it to be. I loved today’s end result, way more than the ready made ones I have ever tasted. Mämmi is also very high in nutritional fibre, protein and iron. If you prepare the dish the right way and it does get naturally sweetened, you won’t even need any syrup or sugar to season it. The mixture of water and syrup that is spread on the surface of the porridge before baking gives the dish some sweetness but its main purpose is to prevent the surface from hardening while baking. Another good thing is that you can freeze mämmi for later use – as it is or in bread dough, for instance.


sunnuntai 22. maaliskuuta 2015

Teeleipiä ja lapsuuden muistoja – Graham Tea Breads


"Paistettuani ensimmäisen pellillisen nuuhkaisin tuoretta leipää ja tunsin takaraivossani muiston pienen nyrjähdyksen.

Luulenpa että kaikille on tuttua aistien välittämät voimakkaat muistikuvat. Eri aistit painottuvat ihmisillä eri tavoin; itselläni muistoja välittävät vahvimmin näkö- sekä hajuaisti. Useat hajuaistin välittämät muistikuvani liittyvät ruokaan jollain tavoin. En tule koskaan unohtamaan, kun perheelläni oli maalla asuessa yhdessä tuttavaperheen kanssa ostettu porsas nimeltä Oskari ja sekoitimme sille keitetyistä perunoista ja erilaisista tähteistä ruokaa. Minulla ei ole tarkkaan tiedossa, mitä kaikkea Oskari pöperössään sai, mutta sen tuoksu on uppoutunut jonnekin selkärankaani. Samoin muistan vahvasti sen kun olimme isäni ja veljeni kanssa autoreissulla pohjoisessa ja pysähdyimme Norjassa Hammerfestin sillan alle virvelillä heittelemään. Pienelle lapselle ei jäänyt mieleen mikä kala oli kyseessä, mutta kun sitä myöhemmin nuotiolla paistettuna raikkaassa ulkoilmassa syötiin, maistui se paremmalta kuin mikään kala varmaan koskaan tulee maistumaankaan.

Mielessäni on usein ollut, että haluaisin valmistaa pitkästä aikaa teeleipiä. Näitä teimme kotitalouden tunneilla liki kaksikymmentä vuotta sitten, mutta grahamleivän maku on jäänyt mieleeni voimakkaana. Onneksi kirjoitin reseptin vihkooni tuolloin ylös, sillä itse oppikirja on jo vuosia sitten kadonnut. Kirja oli Ole hyvä! : kotitaloutta 7. luokalle (Isotalo, Meriluoto, Sippola, & Turunen; Otava). Paistettuani ensimmäisen pellillisen nuuhkaisin tuoretta leipää ja tunsin takaraivossani muiston pienen nyrjähdyksen. Näitä on pakko alkaa tehdä useammin.


Teeleivät (n. 8 kpl):

4 dl grahamjauhoja
4 dl vehnäjauhoja
4 tl leivinjauhetta
1 tl suolaa
4 rkl ruokaöljyä
4 dl maitoa

Kuumenna uuni 225-asteiseksi. Sekoita kuivat aineet keskenään ja lisää sitten joukkoon ruokaöljy ja maito. Sekoita taikinaa mahdollisimman vähän. Jaa taikina nokareiksi pellille ja painele niistä noin 1 cm paksuja leipäsiä. Voit ehkäistä taikinan tarttumista sormiin ripottelemalla pinnalle ensin hieman vehnäjauhoja. Pistele teeleivät haarukalla ja paista noin 15 minuuttia kullanruskeiksi. Tarjoa esimerkiksi haudutetun mustan teen kera.


Teeleivät ovat oikeaa pikaruokaa. Ainesten määrät on helppo muistaa ja taikina yksinkertaisesti vain pyöräytetään valmiiksi. Leipiä saa vaivattomasti muokattuakin: heitä joukkoon esimerkiksi kaurahiutaleita tai juustoraastetta, niin leipä maistuu taas erilaiselta. Parhaimmillaan teeleipä on kuitenkin omasta mielestäni yksinkertaisena ja graham-jauhojen myötä sopivan rouheana versiona. Tuore leipä ei edes kaipaa päälliseksi muuta kuin nokareen rasvaa.

*  *  *


I believe everybody knows what I mean when talking about memories that can be awaken by different senses. People use their senses differently, too; my strongest sense-related memories come through vision and smell. And what do you know, many of the memories that connect to the sense of smell are one way or another about food. I don’t think I’ll ever forget when our family had a pig that was bought together with another family. His name was Oskari, and we used to mash him food from boiled potatoes and different types of leftovers. I’m not sure what exactly was put in the food, but the smell has settled in somewhere in my spine, so to speak. Another clear memory is when we travelled north with my dad and brother, and stopped under Hammerfest bridge in Norway to fish. I was quite small so I don’t know what kind of fish we had, but it tasted better than any fish ever will, when we later on fried it on open fire when camping near reindeer pastures.

I have often thought about baking tea breads. We made these at home economic class almost twenty years ago, but I could still remember the scent and flavour of the graham breads. Luckily I wrote the recipe down in my note book, because the school book is long gone. After baking the first tray I smelled the fresh tea bread and could feel the memory sprain in the back of my head. I have got to bake these more often.


Tea Breads (about 8 pieces):

4 dl (1 3/4 cups) graham flour
4 dl (1 3/4 cups) plain flour
4 tsp. baking powder
1 tsp salt
4 tbsp. canola oil
4 dl (1 3/4 cups) milk

Preheat the oven to 225 C / 435 F. Mix together the dry ingredients, then add in canola oil and milk. Stir as little as possible. Divide the bread dough into small-ish lumps on a baking tray, then pat them about 1 cm or 1/3 of an inch thick breads. You can prevent the dough from sticking to your fingers by first sprinkling some plain flour on top of the dough. Prick the breads with a fork and bake for about 15 minutes until golden brown. Serve the tea breads with some black tea, for instance.


Tea breads are real fast food. The measures are easy to remember and the dough is simply just rolled over and it’s done. It’s also easy to modify the bread: simply add in some oat flakes or grated cheese and it will taste completely different. I still think that the bread is at its best when made simple. The graham fits it perfectly. And freshly baked it won’t even need any toppings, just some butter. 


sunnuntai 8. maaliskuuta 2015

Rapeat ruisnapit – Crunchy Rye Buttons


Herkulliseen ruisjuureen pyöräytetty taikina maistuu koossa kuin koossa. Tällä kertaa valmistin pieniä ruisnappeja, jotka sopivat täydellisesti rapean kuoren ystäville. Napit ovat rapsakoita pinnalta mutta sisälle mahtuu edelleen mehevä sydän. Reseptinä ruisnapeilla on jo aikaisemmin esittelemäni yksinkertainen ruisleipätaikina.


Ruisnapit juureen:

1. päivä: raski
leipäjuuri (n. 2 dl)
8 dl vettä
6 dl karkeita ruisjauhoja

2. päivä: taikina
1–1 1/2 rkl suolaa
2 dl vettä
n. 1,5 l / 800 g ruisjauhoja

Valmista leipäjuuresta raski sekoittamalla ainekset ilmavasti vellimäiseksi. Peitä kulho liinalla ja jätä huoneenlämpöön tai mieluusti hieman lämpimämpään lepäämään noin 12 tunniksi. Sekoita raskia tämän aikana muutaman kerran. Seuraavana päivänä sekoita raskiin suola sekä kädenlämpöinen vesi. Alusta taikinaksi jauhoja vähitellen lisäämällä. Voit loppuvaiheessa kumota taikinan työtasolle ja vaivata siinä loppuun. Taikinan kuuluu olla hyvin pehmeää mutta käsiteltävissä. Siirrä taikina takaisin kulhoon ja anna nousta kaksinkertaiseksi 3–6 tuntia. Ota kohonneesta taikinasta n. 2 dl talteen taikinajuureksi.

Lisää työtasolle runsaasti jauhoja ja leikkaa taikinasta pala työstettäväksi. Vaivaa taikinasta ilmakuplat pois ja paloittele siitä pieniä tasakokoisia palasia. Pyörittele palaset palleroiksi ja litistä 1–2 cm paksuiksi napeiksi. Nosta ruisnapit paistopellille ja ripottele pinnalle kevyesti ruisjauhoja. Anna leipien nousta liinalla peitettynä 1–2 tuntia. Lämmitä uuni 200-asteiseksi ja laita sen pohjalle pieni vesiastia, jotta uuniin muodostuu höyryä. Pistele leivät haarukalla ja paista niitä 20 minuuttia. Laske lämpö 150 asteeseen ja anna leipien paistua vielä 15–20 minuuttia. Leipä on kypsä, kun sen pohja on kova mutta joustaa painaessa.


Ruisnapit ovat mukavan simppeleitä ja nopeita valmistettavia, kunhan itse taikinan saa valmiiksi. Nämä sopivat hyvin juhlan pieniksi makupaloiksi erilaisten täytteiden kanssa. Samaten ruisnapit ovat oiva vieminen kylään. Mikseivät ne korvaisi vaikka limppua tupaantuliaislahjana? Muista suola!


* * *


Delicious sourdough is tasty in no matter what size. This time I baked small rye buttons that are perfect for someone who loves tasty bread crust. Small rye buttons are super crunchy but they still have a soft heart. The recipe I used is the same simple one I have previously introduced to you.


Rye Buttons:

1st day:
rye starter (about 2 dl or 3/4 cup)
8 dl (1 3/4 pt) water
6 dl (1 1/4 pt) wholegrain rye flour

2nd day:
1– 1 1/2 tbsp. salt
2 dl (3/4 cup) water
about 1,5 l / 800 g (3 1/4 pt / 1 3/4 lbs) wholegrain rye flour

Prepare the pre-dough by combining the starter with body temperature water and rye flour into a porridge-like mixture. Cover the bowl with a baking cloth and keep in room temperature (preferably even a bit warmer) for about 12 hours. During this time it's good to give the dough a good stir every now and then. The next day, add salt and body temperature water. Add rye flour little by little. At the end you can flip the dough onto a working top to carefully knead in the rest of the flour. The dough should be very soft but handleable. Put the dough back into the bowl and let rise until doubled, about 3–6 hours. After risen, take about 2 dl piece and store it as a starter.

Add plenty of flour to the working top and cut out a piece the dough to work with. Knead the air out, then cut the dough into small pieces and roll them. Flatten the pieces a bit to form a button like shape that’s about 1–2 cm (3/4 inch) thick. Place the buttons on a baking tray and sprinkle some flour on top. Let the rye buttons rise for about 1–2 hours. Meanwhile, pre-heat the oven to 200 C / 390 F. Place a small dish with water on the bottom to form steam into the oven. Prick the rye buttons with a fork and bake them for 20 minutes. Lower the heat to 150 C / 300 F and continue baking for another 15–20 minutes. The bread is well done when the bottom is hard but resilient.


Rye buttons are simple and rather quick to bake – once you have the dough, that is. I think they’re perfect for a party with different kinds of toppings. They’re also a nice gift to take when visiting a friend. Or better yet, why not replace the traditional rye bread loaf as a house warming gift with these little munchies? Don’t forget the salt!